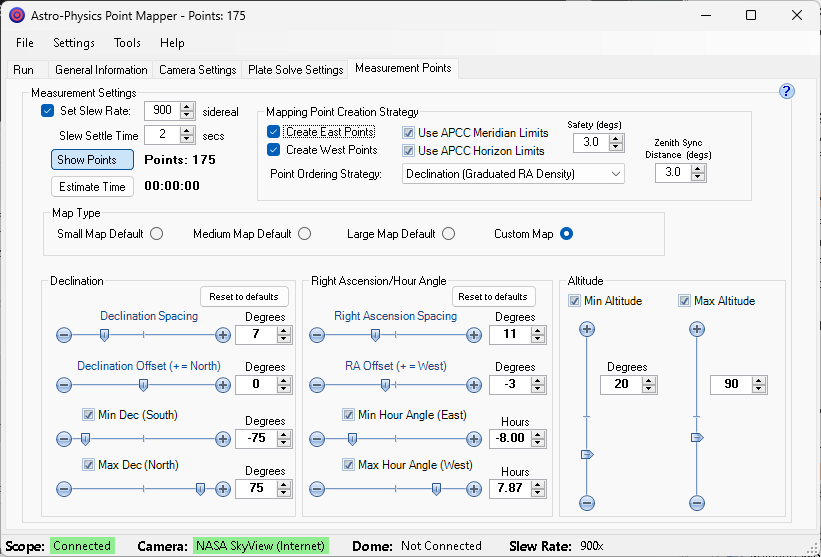
Measurement Points Tab

Contents
Tip: For best results, we recommend that you open up the Progress/Point Map by clicking the Show Points button (see below) before beginning to make any changes to the parameters in this tab. The Progress/Point Map will give you an immediate visual representation of the changes you are making. |
Measurement Settings Group Box
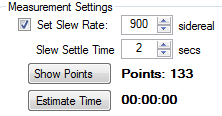
Set Slew Rate: If enabled the Slew rate value is used for slewing the mount. This overrides the settings in APCC and the driver.
Hint: You may want to set a slower slew rate if your scope is setup in a residential area. This should lower the possibility that noise from your slewing mount will disturb a neighbor!
Slew Settle Time (secs): The time in seconds APPM will pause after a slew to a new point completes. This allows the system to settle at its new position after each slew. Astro-Physics mounts generally do not require more than a second or two of settle time, but you may want a longer time if your optical / imaging train needs a few extra moments to settle.
Show Points: This brings up a map of the points that will be mapped. See here for more information.
Estimate Time: This will estimate the approximate time to complete the current run. You should consider the reported time as the minimum time the run will take. If plate solves take longer than expected the actual time could be substantially longer.
Note: You must click the Estimate Time button any time you make a change to the point mapping in order for the time to update. |
Mapping Point Creation Strategy Group Box

Create East Points: When checked East-side mapping points are generated. East side mapping points have the scope on the west side of the pier.
Create West Points: When checked West-side mapping points are generated. West side mapping points have the scope on the east side of the pier.
Use APCC Meridian Limits: When checked APPM will use the meridian limits points from APCC to create additional mapping points for "counterweight-up" telescope positions. If you make changes in APCC to the Meridian Limits while APPM is running you will need to click the Refresh Meridian/Horizon limits from APCC option in the Settings Menu to import the APCC Meridian Limits into APPM.
Use APCC Horizon Limits: When checked APPM will use the horizon limits points from APCC to limit mapping points to positions above the defined horizon. Points below your APCC Horizon Limits will not be included in the point mapping. If you make changes in APCC to the Horizon Limits while APPM is running you will need to click the Refresh Meridian/Horizon limits from APCC option in the Settings Menu to import the APCC Horizon Limits into APPM.
Safety (degs): This allows you to specify an extra number of degrees before the meridian (or the meridian limit if Use APCC Meridian Limits is checked) for which mapping points will not be created. In most cases you should set to 0-3 degrees.
Point Ordering Strategy: This determines the order that the mapping points will be executed. The two declination strategies reduce slew times and place priority towards a higher-accuracy RA tracking model. The options are:
oDeclination: points are mapped at one declination at a time. As declination moves away from the celestial equator the actual sky distance between points decreases.
oDeclination (Equal RA Density): points are mapped at one declination at a time. RA Spacing increases inversely to Cosine of declination so that RA sky spacing remains the same at each declination.
oDeclination (Graduated RA Density): points are mapped at one declination at a time. For declinations of +/-45 to +/-65 degrees, RA density is increased by 1.5x over the selected spacing . Above +/-65 degrees, density is 2.0x. This should improve data at higher (lower in southern hemisphere) declinations without committing to the huge number of points required for the Equal RA Density spacing.
oHour Angle (For Dome Setups): points are mapped at one hour angle at a time. This reduces the amount of movement a dome slit might need to do.
oCustom: You can provide your own set of mapping points. For an example of the mapping points use the menu option to export points to see the latest format. This should only be attempted by advanced users.
Zenith Sync Distance (degs): When starting a run APPM will slew to near the zenith and perform a Sync (Recal). The number of degrees from the zenith is specified by this option. Usually 3.0 degrees is a good value.
Map Type

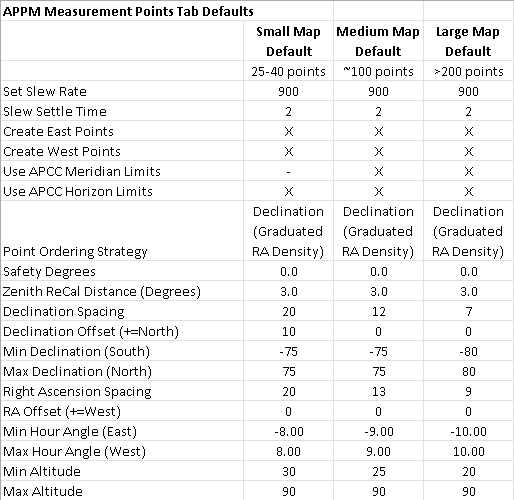
Small Map Default: Sets the Small Map Default values in the table below.
Medium Map Default: Sets the Medium Map Default values in the table below.
Large Map Default: Sets the Large Map Default values in the table below.
Custom Map: If any values are changed when using one of the default settings above, the map automatically converts to a Custom Map type.
Declination Group Box
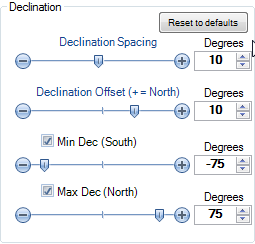
Reset to defaults: Resets the Declination group box settings to default values.
Declination Spacing: The spacing, in degrees, between Declination mapping points.
Declination Offset: The offset, in degrees, relative to the celestial equator for Declination mapping points will be created.
Min Declination: The minimum Declination at which mapping points will be created. This is primarily useful for southern hemisphere users who do not wish to map points too close to their pole. Since errors near the pole can be problematic, some people will get better overall results if they set this limit above the default of -85 degrees. The checkbox MUST be checked for this limit to take effect!
Max Declination: The maximum Declination at which mapping points will be created. This is primarily useful for northern hemisphere users who do not wish to map points too close to their pole. Since errors near the pole can be problematic, some people will get better overall results if they set this limit below the default of +85 degrees. The checkbox MUST be checked for this limit to take effect!
Right Ascension Group Box
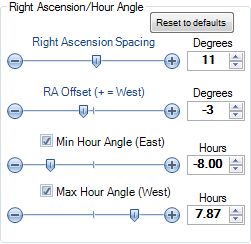
Reset to defaults: Resets the Right Ascension group box settings to default values.
Right Ascension Spacing: The spacing, in degrees, between Right Ascension mapping points. Note that this spacing is in degrees - not in units of right ascension.
Right Ascension Offset: The offset, in degrees, relative to the meridian for which Right Ascension mapping points will be created.
Min Hour Angle: The minimum hour angle at which mapping points will be created. Remember that hour angles extend below -6 hours when below the pole. The checkbox MUST be checked for this limit to take effect!
Max Hour Angle: The maximum hour angle at which mapping points will be created Remember that hour angles extend above +6 hours when below the pole. The checkbox MUST be checked for this limit to take effect!
Altitude Group Box
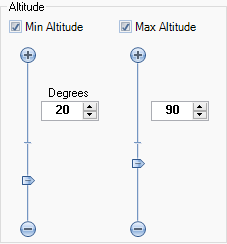
Min Altitude: when enabled no points below the minimum altitude are created. The checkbox MUST be checked for this limit to take effect!
Max Altitude: when enabled no points above the maximum altitude are created. This can be helpful to avoid creating points near the meridian if the telescope is unable to reach that sky position. The checkbox MUST be checked for this limit to take effect! NOTE: The Zenith Sync Distance will internally be adjusted by the difference of the Max Altitude from the Zenith. For example, if the Max Altitude setting is 10 degrees and Zenith Sync Distance is 3 degrees, APPM will select the first sync point 13 degrees from the zenith (10 + 3 degrees).