Homing/Limits Tab - Limits for both tracking and slewing.

Contents
Note: The RA Limits that you set here will override any custom Meridian Limits you may have set on the Meridian Tab. These limits are the preferred choice for those using automation software that cannot accommodate the varied limits from the Meridian Tab anyway. Users who are more "hands on" may wish to keep these RA limits OFF and use the customizable limits from the Meridian Tab. Dec Limits should almost always be ON. |
Note: APCC Home and Limits will display only if you have a non-encoder mount. If you have a mount with Absolute Encoders, the AE Home and Limits Tab will be displayed instead. |
Introduction and Operation Basics
Celestial coordinates are somewhat dynamic in an astronomical mounting. We regularly tweak our celestial pointing positions following a plate-solve, or after centering a star. This ability to modify the pointing coordinates, while mostly advantageous, can lead to errors and mistakes. The result of a "bad" Sync or ReCal can be a lost mount.
The Astro-Physics GTO Servo System is smart! As long as the clutches remain fully engaged, it can determine the true mechanical position as well as knowing the celestial coordinates. Because celestial coordinates are subject to error, the mechanical position can be used for independent Home and Limits.
In brief, here are the steps to establishing Home and Limits on any mount that does NOT have Absolute Encoders:
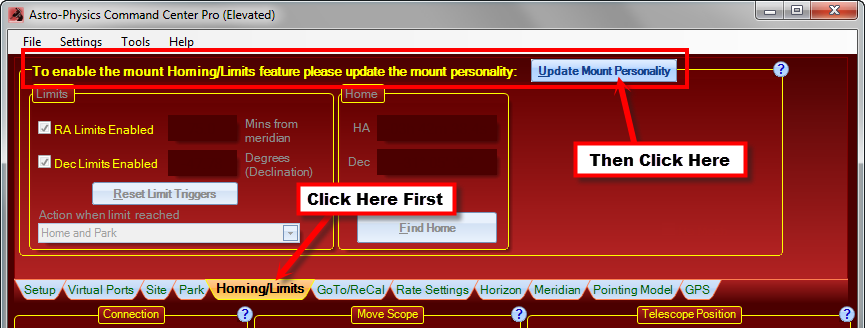
1.GTOCP3 ONLY! If you have a GTOCP3, you will most likely need to run the APCC_Personality_Update.exe program that is incorporated into APCC. APCC will restrict all other functions of the Homing/Limits tab until this is done. The Personality Update will be your only live option from the tab. This only needs to be done the very first time you set up with Home and Limits. It never needs to be done again, and will, in fact, not be offered as an option again on this particular GTOCP3. It will direct you as needed, and only modify settings that are needed.
a.Start APCC
b.Click on the Homing/Limits Tab.
c.Click the Update Mount Personality button at the top.
d.Follow the simple instructions.
e.Be sure that you restart APCC and power-cycle the mount (OFF - wait - ON) as instructed at the end.
2.ALL CONTROL BOXES Your mount should be fully set up and calibrated. All operations that might involve the clutches should be finished.
3.Click on the Homing/Limits Tab in APCC.
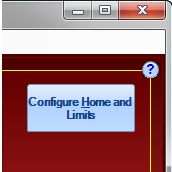
4.Click Configure Home and Limits button.
a.Select a Home Position
b.Set limit parameters
c.Click Set Home Position
d.Wait for the message saying that the configuration is finished.
5.Activate limits or not as you wish. (Dec limits should almost always be turned ON.)
That's really all there is to it. From this point forward, as long as the mount is not moved via the clutches, it will have a "Home" position that will always correctly re-establish pointing position, and it will have available limits to prevent an axis from moving into a dangerous position.
•Click Find Home to send the mount to the Home position and reestablish pointing.
•Select Limit Action
•Turn RA limits on or off as needed with the check-box.
•Turn Dec limits on or off as needed with the check-box.
Warning: Moving the mount via the clutches will invalidate your Home and Limit positions. You are certainly free to use the clutches if needed, but just remember that you must reconfigure Home and Limits when you are finished and properly recalibrated again. |
APCC Personality Update Program - GTOCP3 Control Boxes
The Home and Limits system that we have developed for APCC uses some of the features and capabilites that were originally designed for the 3600GTO's Home and Limit System and for the Absolute Encoder's Home and Limit functions. These capabilities are present in the Rev V and later chips that are required for APCC, but they are dormant in mounts that have not been configured for these advanced features. The small APCC_Personality_Update program updates the personality configuration to make these capabilities available.
Note: The APCC_Personality_Update program is designed to be harmless to your system. It is safe to run regardless of whether the mount is already configured for the Home and Limits. (You may not know for sure!) It does not corrupt or change any of your other vital personality parameters. This program is for GTOCP3 Control boxes ONLY. It is not needed, and will not run on GTOCP4/5 Control Boxes. |
To run the program, first start APCC. APCC should be connected to the mount, and should already be configured to work with the AP V2 ASCOM Driver. You should not have other ASCOM client programs running or connected at this time. When you start APCC, it polls for the relevant personality setting. APCC therefore knows whether to allow Homing/Limits tab access, or whether the update program is required. Once you are ready to go, simply click on the Homing/Limits tab. If you need the update, the Homing/Limits tab will look like the screen below.
First, the program will gather all the personality data that is currently in your GTO control box. The program temporarily saves this information. The following window will appear:
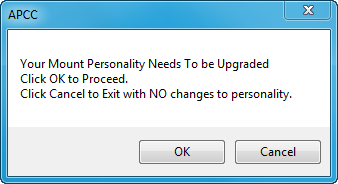
Clicking Cancel will exit WITHOUT MAKING ANY CHANGES. Clicking OK will tell the program to proceed. After a few seconds, you should get the following message:
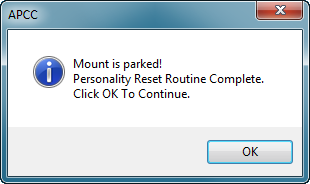
Clicking OK then opens a window with these final instructions:
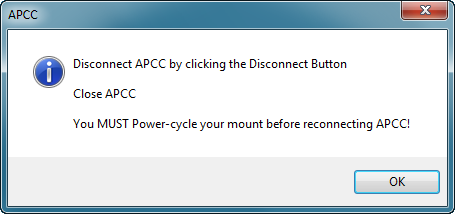
It is important that you follow all three instructions in order:
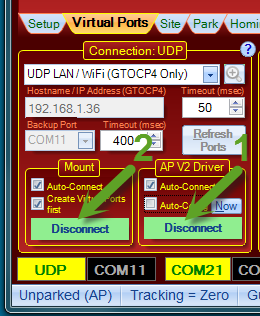
1.Disconnect the AP V2 Driver, and then APCC from the GTO Control Box by clicking the Disconnect buttons in the Connections Box.
2.Close APCC. You may need to disconnect any other ASCOM client programs that are still connected before you can close.
3.Power-cycle your mount. Allow at least 15 seconds between power-down and power-up.
4.You are now ready for all normal operations of the mount, including taking advantage of the APCC Home and Limits Feature.
Configure Home and Limits
The next step in using the Home and Limits Tab is to configure the Home positions and choose limits. This topic is presented in its own separate section.
Please click on this link to go to the Configure Home and Limits page of these instructions.
Note: Be sure to return to this page for additional important information on using the Home and Limits Features after you have visited the Configure Home and Limits page! |
Clutches warning
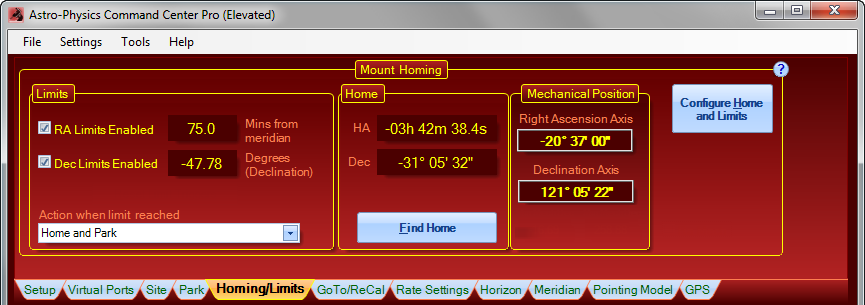
Limits Box
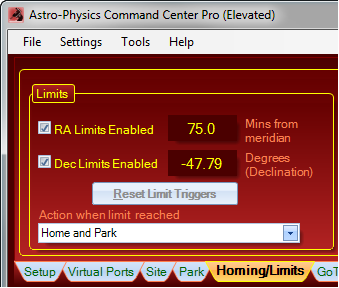
The Limits Box is where you enable or disable the limits you have configured. It is also where you set the action that will occur should you slew or track into a limit. To enable or disable the RA or Dec limits, simply check or uncheck the appropriate box.
Note: The displayed values might seem a bit confusing at first, especially in light of what you entered when you configured the Home and Limits. •The RA value is the distance in RA minutes that you allow the mount to go past the meridian. It is consistent with the value you entered when you configured Home and Limits. In the example above, the mount can travel 75 minutes (1 hour 15 minutes) past the meridian in either direction before activating the RA limit. •The Dec value is where most people get confused. The Dec limit is basically determined by your latitude. It will correspond somewhat to the Dec value at the Park 4 position. However, to allow a bit of cushion, you are allowed to set a bit of additional travel before the limit is activated. The displayed value is the declination of this "cushioned" limit. |
Action when limit is reached: The drop-down box at the bottom of the Limits Box gives you options for what happens when a limit is reached.
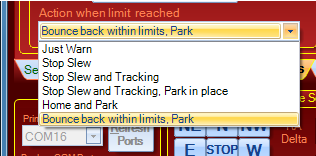
The options shown above are relatively self-explanatory, but there are a few things that we want to point out. In all cases, when a limit is reached, a warning box like the following will appear. The exact text of the warning will depend on the action-option chosen.

•Just Warn No action will be taken apart from the display of a warning box. This could be useful if you are present at the mount and can take action yourself as needed.
•Stop Slew A slew that hits the limit will be stopped, but tracking into a limit will only generate the warning box. Sidereal tracking will be allowed to continue past the limit. This may be useful for a somewhat attended mount where protection during a slew is desired, but where you also want the freedom to continue tracking with the APCC meridian limits providing the next line of defense.
•Stop Slew and Tracking A slew in progress will be stopped when the limit is hit. Tracking will also be stopped when the limit is hit. Motors will remain energized since the mount will NOT be put into a parked state.
•Stop Slew and Tracking. Park in place. A slew in progress will be stopped when the limit is hit. Tracking will also be stopped when the limit is hit. The mount will be placed into a parked state where it stopped, but will not be moved to a predefined park position.
•Home and Park Mount motion will be stopped, and the Find Home sequence will be initiated. The mount will end up parked and recalibrated at the home position.
•Bounce back within limits. Park When a limit is hit, the mount will stop, and then "bounce" back out of the limit (a short move in the opposite direction to clear the limit). It will then enter a parked state.
Most users should use the "Home and Park" or the "Bounce back within limits. Park" option. For totally remote users, the Home and Park option is probably safest, especially if there is an issue with roof closure. The bounce option can be useful in that it provides both safety and still allows you to see where you were when a problem may have occurred.
Home Box
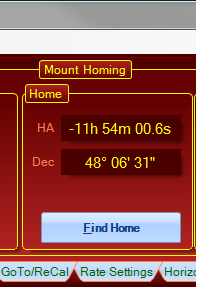
The Home box tells you the coordinates of your Home position. Coordinates are given in Hour Angle and Declination.
Find Home - What Happens?
The "Find Home" button is used if you have somehow gotten the mount lost. It starts a sequence of events that end up with the mount in its home position, and with the celestial coordinates correctly reestablished. Here is a summary of the sequence following a click of the "Find Home" button:
•Tracking is stopped.
•The RA axis is moved to the RA Home position.
•Once RA is finished, the declination moves to its Home position.
•When both axes are "Home", the Home celestial coordinates are commanded and then a full Sync is done.
Mechanical Position Box
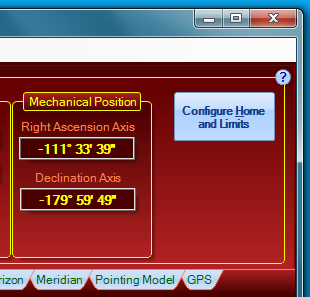
The Mechanical Position box tells you the current distance in degrees, minutes and seconds from the defined Home position. These values are especially useful when you define Home to be at Park 3, with the counterweight shaft pointing down and the scope pointing at the pole. For other home positions, you may need to do a bit of mental arithmetic to relate to the mechanical position.