Operational Work Flow Basics

Contents
Introduction
The earlier section on Getting Started Work Flow was designed to help you get the system up and running. This section will guide you through normal operations as you use APCC with other software to achieve your observing or imaging goals. The steps below are not hard and fast rules. They are guides that, if followed, will present the easiest and most trouble-free way of operating your system as a whole.
Use the AP V2 ASCOM Driver
First off, the question often arises: If I have a choice between using an external program's native driver (as in TheSkyX), or connecting the software through the AP V2 ASCOM Driver, which should I choose? We strongly advise using the AP V2 ASCOM Driver. Here are some reasons:
1.The AP V2 ASCOM Driver is a full fledged hub. It will accommodate a very large number of programs all connected at the same time, and will do so without any problems. As a single hub, the driver will minimize the serial traffic between the software and the mount by eliminating redundancy.
2.The AP V2 ASCOM Driver takes advantage of the full set of Astro-Physics servo commands, many of which were developed specifically for either the driver or for APCC. Since these new commands are not being published, the native drivers found in other software will be limited to the older set of published commands.
3.The AP V2 ASCOM Driver can create log files for troubleshooting any issues that you may have.
4.We can provide a certain amount of support if you encounter issues with a program that uses the AP V2 ASCOM Driver. We, of course, cannot fix a problem that is in someone else's software, but we may be able to figure out what is happening to cause the problem. If you use a native driver, you will be limited to the support that the software provider can give you. We are unable to support someone else's driver.
Order of Operations
While there are several ways that you can start up and run your system, we recommend the following order of operations:
1.Power up your imaging camera(s) and software and start the cooler(s). This is simply a time saver. The cameras might as well be cooling while the rest of the system is being activated.
2.Power up your mount. Since APCC automatically sets the Safety Park feature in the servo, the mount will not start default sidereal tracking, even if it was not properly shut down at the end of the previous session. The mount will quietly wait in place until it is initialized and unparked by APCC with NO loss of pointing accuracy.
3.Start APCC. If you checked the Auto-Connect When Started box in the Connection group box on the main page, APCC will connect automatically to the mount and initialize it. It will then create all of the virtual ports that you have defined. Finally, if the Auto-Connect Driver when APCC connects box is checked on the Virtual Ports tab it will start up the AP V2 ASCOM Driver and connect to it through the first virtual port.
4.Connect the imaging software to the mount if you normally do that. This was added as a separate instruction because we advised you to start your imaging software earlier to cool the camera and we don't want you to forget.
5.Start and connect other software. Start up each additional piece of software that you will be using and connect that software to the mount, and to any other relevant devices. Refer to the other software and hardware documentation for advice on the order in which you power other devices like focusers and start the various other programs.
6.DO YOUR ASTRO-THING!
Note: Many of you with remote operations will have a scripting program like ACP or CCD Auto-Pilot that will do this for you. If this is the case, we still recommend this basic sequence except that the first thing activated will be the scripting software. Your scripts should include sufficient time (waits) for each element to be completed before proceeding to the next.
If you insist on starting everything from an ASCOM client program (not the preferred method), please note the following: The two checkboxes in the AP V2 Driver section of APCC's Connection group box (Auto-Connect and Auto-Config) must be UN-checked. Also, in APCC's Advanced Settings window: Check Auto-Initialize and set the value to zero. Check the Auto-Shutdown and set its value to 1 second.
Shutdown
The shutdown sequence is very much the reverse of the Order of Operations listed above with a couple exceptions. Here is the recommended sequence:
1.Start the imager's cooler warm-up. Again, this is listed first as a time saver. For cameras that require a warm-up, this might as well be going on while the rest of the shutdown is taking place.
2.Park the mount. Most of you will choose to park the mount to a predefined park position, even though this is not strictly necessary with an Astro-Physics mount. For many, the park position is dictated by the observatory architecture, or by the positioning of a flat screen. See the Park Tab section for more details. If you are using TheSkyX to park the mount, be sure to see the special note!
3.Disconnect the imaging software from the mount. Since the warm-up of the cooler can take a while, the imaging software is often the last piece of software to be closed down before shutting off the computer. You will want to disconnect the imaging software from the mount before closing APCC.
4.Disconnect and shut down other software. Disconnect each piece of software from the mount and any other devices that it controls, and then shut that piece of software down.
5.Verify that everything is disconnected. There are 2 steps to this:
a.If you have connected to the mount with one or more NON-ASCOM programs, go to the Virtual Ports tab and make sure that the only active virtual port is the top one (the AP V2 ASCOM Driver's port). You do not need to delete the other ports that you may have. Just make sure that no further data is being transmitted or received over the lower three virtual ports. If you only connect to the mount through ASCOM clients, you can skip this step.
b.The AP V2 ASCOM Driver has an indicator at the top of the Handbox Window that tells you how many clients are connected. (See the AP V2 ASCOM Driver's help file.)
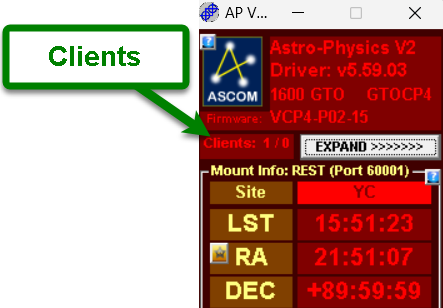
The first value (in the above case a 1 ) tells you how many client programs are still connected to the mount. The second value tells you how many DC synchronous focusers are connected. (Note: Digital focusers and focusers requiring drivers cannot use the simple AP focus controls and are NOT included in this count. For most of you, the second value will always be a zero.) When the client count gets down to 1, all the programs have been disconnected. The remaining 1 is APCC. If you have chosen the Auto-Shutdown feature in the Advanced Settings window, the shutdown timer will start when the last client apart from APCC is disconnected.
6.Close APCC. If you did not choose Auto-Shutdown as mentioned above, close APCC in one of the conventional ways. When APCC closes, it will also close the last instance of the AP V2 ASCOM Driver. APCC and the driver should be shut down before proceeding to the next step.
7.Power off the mount.
8.Finish closing down your imager and shut down the observatory.