ELS Tab

Contents
The ELS tab is only for the 3600GTO and 3600GTOPE mounts, which utilize the functions of the GTOELS secondary control box. The ELS Tab allows you to configure the limit and home switches as well as the R.A. precision encoder settings, if your mount has these features. It also has a provision for making extremely accurate home position determinations. This allows pointing recovery from the home position to be within a few arc minutes.
3600GTO and 3600GTOPE Models
Review the following information regarding these mount models and how the ELS Control Box is used for each. You may also wish to refer to this document on the Astro-Physics website for further information and ordering instructions: Limit/Homing Switch System for the 3600GTO and 3600GTOPE
3600GTOPE without optional Limit/Homing Switch System: The ELS Control Box was included with the 3600GTOPE mounts to enable control of the R.A. precision encoder, which was installed in these mounts during initial manufacture (the R.A. precision encoder cannot be purchased as an upgrade). The Configure group box of the ELS tab allows the R.A. encoder to be enabled or disabled and allows a trim rate to be set. The remaining functions related to the Limit/Homing Switches cannot be utilized unless these components are purchased as an optional upgrade and installed by the user.
3600GTOPE with optional Limit/Homing Switch System: In addition to the control of the R.A. precision encoder described above, the ELS Tab enables full control of the limit/homing switch system, including activation of the software limits.
3600GTO with optional Limit/Homing Switch System and with GTOELS Control Box: This mount can utilize all functions related to limits and home position available on the ELS Tab. Since the mount does not have the R.A. precision encoder, the Encoder and Encoder Trim functions are not available.
3600GTO with optional Limit/Homing Switch System without GTOELS Control Box: Since this mount does not have the GTOELS Control box, it cannot take advantage of the ELS tab. Consult the user manual for the limit/homing switch system for operational instructions. The GTOELS Control Box is available as an option and can be purchased separately and installed by the user. Contact Astro-Physics for details. This mount does not have the R.A. precision encoder, so the Encoder and Encoder Trim functions are not available.
3600GTO without optional Limit/Homing Switch System: The GTOELS Tab is not useful for this mount. The limit/homing switch system and GTOELS Control Box are available as an option and can be purchased separately and installed by the user. Contact Astro-Physics for details.

TIP: Be sure to look at the General work flow for precise recovery using the Home Position section at the bottom of this page. |
Configure
The Configure box is basically where you turn the ELS features on and off.
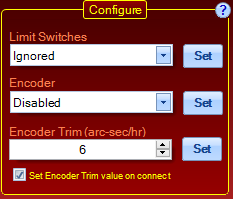
Limit switches: This drop-down list box has several options:
Ignored |
The limit switches will be ignored. |
Zero RA on Switch |
RA tracking will stop when the switch is reached. The R.A. axis will only move in the direction of the home position. |
Bounce RA and Park |
The motion that caused the limit switch to activate will be stopped, and a short slew or "bounce" in the opposite direction will be made to disengage the limit switch. RA tracking will stop and the mount will be in a parked state. |
Encoder: This drop-down list box configures the encoder operation. There are two options: Enabled and Disabled.
Encoder Trim: You can adjust the encoder-based trim rate with this setting. Encoder trim can be set to adjust for the apparent non-sidereal tracking rate of objects due to atmospheric refraction, polar misalignment, flexure and other causes.
Encoder trim is entered in arc-seconds per hour, and will trim the R.A. tracking rate without affecting the R.A. coordinates in the servo. DO NOT use any encoder trim if you are also using the APCC pointing model! Use the tracking correction in the Pointing Model instead. See your 3600-LSS-PE-instructions for more details.
Set: For all of the above configuration settings you need to click the appropriate ![]() button to save the change. You must press the set button after selection for the changes to take place.
button to save the change. You must press the set button after selection for the changes to take place.
Set Encoder Trim value on connect: When enabled APCC will automatically set the encoder trim value when you connect to the mount.
Status
The Status box is where information is read directly from the mount.
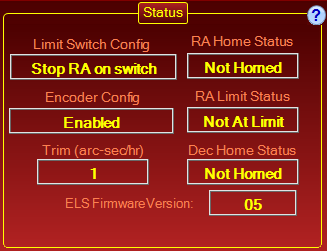
Limit Switch Config: This is the read back of the limit switch setting.
Ignored |
The limit switches will be ignored. |
Zero RA on Switch |
RA tracking will stop when the switch is reached. The R.A. axis will only move in the direction of the home position. |
Bounce RA and Park |
The motion that caused the limit switch to activate will be stopped, and a short slew or "bounce" in the opposite direction will be made to disengage the limit switch. RA tracking will stop and the mount will be in a parked state. |
RA Home Status: Either Homed or Not Homed. The "Homed" response will be given whenever the home switches are activated. This does not necessarily imply that the mount is precisely at the home position that you will define below with the Establish Home routine. It simply means that the respective Home Switch has been closed.
Encoder Config: Either Enabled or Disabled.
RA Limit Status: Either Limit or Not at Limit.
Trim: The currently set encoder trim value in arc-sec/hour. Please note that a returned value that is different from the entered value by one or two arc-seconds per hour is not uncommon. The value internal to the encoder system will be correct.
Dec Home Status: Either Homed or Not Homed. As with the R.A. Home Status above, the "Homed" response will be given whenever the home switches are activated. This does not necessarily imply that the mount is precisely at the home position that you will define below with the Establish Home routine.
ELS Firmware Version: The version of firmware in the GTOELS box.
Mechanical Position
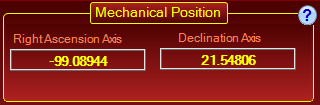
Right Ascension Axis: The internal mechanical angle (degrees) of the Right Ascension Axis. The mechanical position is relative to the established home position.
Declination Axis: The internal mechanical angle (degrees) of the Declination Axis. This mechanical position is also relative to the established home position.
Home Position
Overview: The Home position is a mechanical position that roughly mimics the Astro-Physics Park 2 position for conventional scope orientations (Park 3 for side-by-side setups). Its precise position can be adjusted by a small amount via the actuators on the mount, and we have developed a routine to establish a precise mapping to celestial coordinates. The general work flow description will be provided below the information for each of the individual components in the home position box.
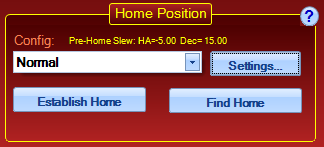
Config Drop-down Box: This selection tells APCC whether your telescope is set up in the conventional orientation (Home roughly equivalent to the AP Park 2 position) or in a side-by-side setup (Home roughly equivalent to Park 3). A third "Custom" setting is also available. This configuration then provides you with default values for the settings described immediately below.
Settings: The settings defined in this window determine how the mount will perform its Establish Home and Find Home routines.
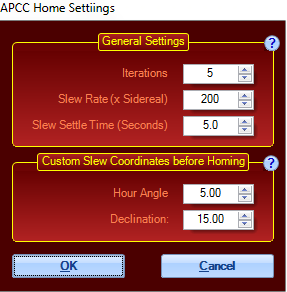
Iterations: This is the number of homing slews that will be used to create the average value in the Establish Home routine. Five iterations is a good value to use with three being the minimum number of iterations that we would recommend. This setting does NOT apply to the Find Home routine.
Slew Rate: (In sidereal units) Because the homing function involves the closing of mechanical switches, precision is improved by using slower slew rates than you might for normal GoTo operation. We have found 200X to be a good compromise between accuracy and speed for this procedure. This rate will be used in BOTH the Establish Home routine and in the Find Home routine if you get the mount lost at a later time. This slower rate ONLY applies to the final short slews into the home position.
Slew Settle Time: Set a value to allow the mount to settle at its position before the next action is undertaken. For the Establish Home routine, this is the settle time before coordinates are read into memory for averaging. For the Find Home routine, it is the settle time before the saved average home coordinates are used to calibrate the GTO Servo Control Box's pointing position.
Custom Slew Coordinates before Homing: APCC uses these coordinates as the "jumping off point" for going home. They are used as the coordinates to which the mount slews between iterations in the Establish Home routine, and they are the coordinates used before the final approach to home in the Find Home routine. The recommended Custom Slew coordinates are in the table below.
|
Northern Hemisphere - Conventional |
Northern Hemisphere - Side-by-side |
Southern Hemisphere - Conventional |
Southern Hemisphere - Side-by-side |
Hour Angle |
-5:00 |
7:00 |
-5:00 |
7:00 |
Declination |
15° |
75° |
-15° |
-75° |
Establish Home: If you have home and limit switches installed with GTOELS support, clicking this button will perform multiple same-direction slews to the home position. Before using this procedure, make sure that you are accurately polar aligned and have recently re-calibrated or synched. You only need to perform the establish home routine once unless you subsequently move the mount via the clutches or move the mount physically as in redoing the polar alignment. Changing the positions of the actuators will also necessitate redoing the Establish Home routine. However, you may repeat the procedure as often as you like - it simply isn't necessary unless the system has been moved manually.
When you click the Establish Home button, the mount performs a number of pairs of slews into and out of the home position. These short slews always come from the same position and are done at the same rate to improve consistency. By having an accurate calibration before you start, and then by averaging the celestial coordinates of the home positions, an extremely accurate mapping can be made between the physical position of the mount when homed by the switches, and the sky. These averaged coordinates are stored in APCC for future use if you ever get your mount lost and need to use the Find Home routine.
The Establish Home routine should be considered as one of the final parts of your system setup. It is something you perform after the mount is fully polar aligned and the system is fully loaded and balanced. Once completed, it seldom needs repeating.
Find Home: If you have home and limit switches installed with GTOELS support, clicking this button will move the mount to the Home position. Before you can do this you must have previously defined the Home position by using the Establish Home routine. Clicking this button will cause the mount to slew to the home position at the normal slew rate. APCC will then perform a full Sync on the saved coordinates and then slew out to the Custom Slew Coordinates before Homing. Finally APCC will slow to the slew rate selected in the Home Settings Window and make a final slew into the home switches. The mount will be allowed to settle, and then it will be re-calibrated on the saved average home coordinates from the Establish Home routine. In testing, first GoTos after intentionally getting totally lost and then running this routine have resulted in pointing that was within a few arc-minutes.
General work flow for precise recovery using the Home Position:
Part 1 - Establishing your Home Coordinates
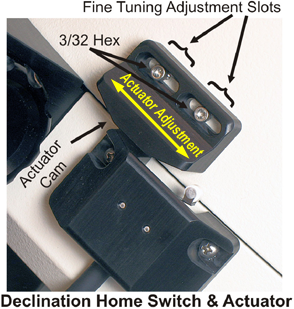
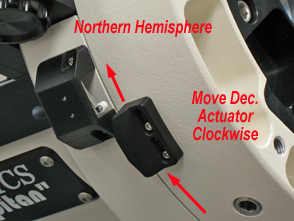
1.Adjust your Home Switch Actuators using a 3/32" hex wrench.
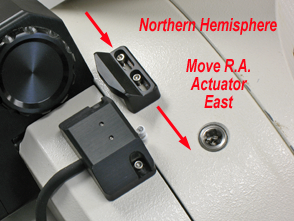
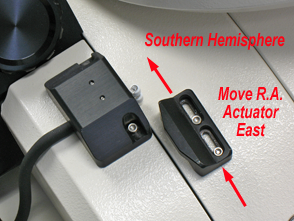
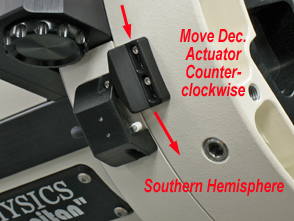
For best results, adjust the R.A. actuator all the way to the east in its fine tuning adjustment slots, regardless of the hemisphere you are in. Note that the hemispheres are opposite in terms of left-right, but are consistent in terms of the cardinal direction EAST. In the northern hemisphere, adjust the Dec. actuator as far clockwise when viewed from above the axis as possible. In the southern hemisphere, move the actuator as far counter-clockwise as possible. These settings will ensure that the home position is at a positive altitude and a small distance away from a quadrant boundary.
Northern Hemisphere |
Southern Hemisphere |
|||
R.A. Actuator |
Move East |
|
Move East |
|
Dec. Actuator |
Move Clockwise |
|
Move Counter-clockwise |
|
2.Make sure you are fully polar aligned. If you refine your polar alignment in the future, you may wish to repeat the Establish Home routine.
3.Your system should be completely assembled and balanced with the clutches tightened to their operational level. If you move the mount via the clutches at a later time, you will need to repeat the Establish Home routine.
4.Calibrate on a star just on the east side of the meridian and just on the celestial equator side of your zenith. For best results, use the "Plate Solve and ReCal" feature in APPM, if you are using the Pro version of APCC.
5.Select the ELS Tab.
6.Choose your scope configuration - Normal, Side-by-side, or Custom
7.Click the Settings Button.
8.Set the various parameters in the Settings window according to the instructions above. Then click OK to accept.
9.Click the Establish Home button. The following dialog box will appear:

Click OK to proceed.
10. Wait while the mount performs the number of homing slews that you chose under "Iterations" in the Settings window.
11.When APCC is finished with the routine, the following dialog box will appear (with somewhat different values):
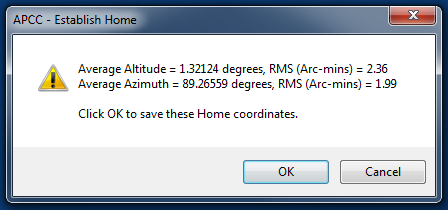
12. Click OK to save the averaged coordinates.
Part 2 - Finding Home if you get your mount lost.
You do NOT need to use the home functions in normal operation of your mount. You only need to use the Home function if you have caused your mount to become lost. The Home function should not be thought of as an alternative method of parking the mount.
1.Select the ELS Tab.
2.Click the Find Home button. The following dialog box will appear:
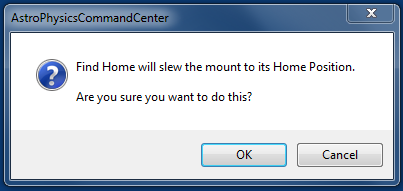
3.Click OK to proceed.
4.Wait while the mount slews to the home position. IT WILL SLEW TO THE HOME POSITION TWICE! The first slew will be at your normal slew rate. Then the mount will slew the short distance to the Custom Slew Coordinates before Homing. And finally, the mount will slew back to the Home position at the slower rate that you selected in the Home Settings window. When it has settled, the following dialog box will appear:
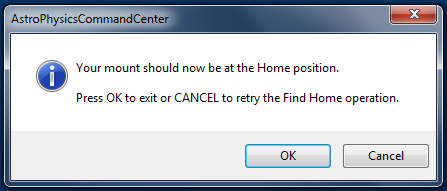
5.Click OK to recalibrate the mount at the Home coordinates.
6.Go to any star or coordinates, center and recalibrate. Or, simply use APPM again for another "Plate Solve and ReCal."