GoTo/ReCal Tab

Contents
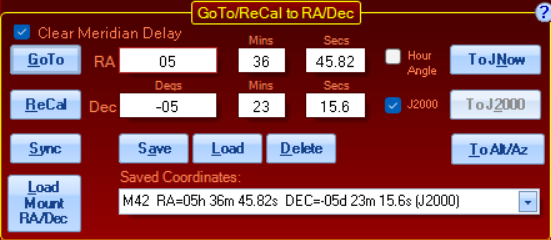
GoTo/ReCal to RA/Dec
The GoTo/ReCal to RA/Dec group box allows you to enter your own coordinates for a slew. Coordinates can also be loaded from previously saved coordinates on the dropdown list, or the your current coordinates can be loaded directly from the mount for saving. These features are especially useful for a number of imaging tasks:
•If you have framed an object at coordinates that are not quite those that are from a catalog, simply load the current "framed coordinates" and save them. Future GoTos to the saved coordinates will place the object in your framing.
•Do you have the perfect focus star for your object? Go to the star, center it, and then load and save the star's coordinates for subsequent focus runs.
Entering Coordinates: Coordinates can be entered manually into the coordinate fields either in sexagesimal (HH:MM:SS or DD:MM:SS) form, or in decimal (HH.hhhhhh or DD.dddddd)form.
If you enter in decimal form, you might see a small warning exclamation point next to the field. The warning is simply to get your attention to be sure you intend the decimal entry. Simply press enter or click into the next field to see the decimal converted to sexagesimal. If entering in normal sexagesimal form, you can use your computer's Tab key to progress through the fields. Declination values can range from -90° to +90°. RA values can range from 0 to 23:59:59.
You can also enter a decimal value in the Mins fields for both RA and Dec. The decimal portion will be converted into seconds automatically when you press the enter key or leave the field.
The RA field can also be used as an hour angle field by checking the Hour Angle checkbox. The hour angle is most easily thought of as the distance from the meridian (meridian = LST) in RA. Positive hour angles are west of the meridian. Negative hour angles are east. The hour angle at any point in time is simply the meridian coordinate minus the RA coordinate (HA = LST - RA). Hour angles are especially useful if you are not tracking. If the mount is tracking, RA remains constant while the hour angle (and the meridian) keep changing with time. If you are stopped (not tracking), your hour angle remains constant, but the RA value will keep changing with time. Park positions, for example, are ideal candidates for coordinates expressed in HA and Dec. Hour angle values can range from -12:00:00 to +12:00:00. To specify an hour angle that is east of the meridian by under an hour (i.e., less than 60 arcminutes), enter -0 for hour angle.
Lastly the entered coordinates can be entered in either the J2000 epoch or JNow (local apparent). The J2000 check box identifies the epoch of the coordinates.
To JNow - converts coordinates from the J2000 epoch (J2000 check box enabled) to local apparent (JNow). This is extremely useful for entering catalog coordinates which are almost always in J2000.
To J2000 - converts coordinates from the JNow (local apparent) (J2000 check box disabled) to the J2000 epoch. This is normally used after loading the current Mount coordinates to compare them to a set of catalog coordinates.
To Alt/Az - converts coordinates to Alt/Az and fills the fields in the Goto/Recal to Alt/Az group box. If J2000 is checked the coordinates will be converted to local apparent first, then converted to Alt/Az.
Clear Meridian Delay: Normally you will want this check box enabled as it can prevent a pier collision. When enabled, the resulting slew position will always be with the telescope counterweight down.
However, if you want to slew to a counterweight-up position, then you may need to disable this option and set the mount's meridian delay appropriately. Care should be taken to prevent a pier collision!
GoTo: Clicking this will slew the mount to the RA/Dec position you have entered. A confirmation dialog box will appear. Click OK to initiate the slew.

The Emergency Stop Window will appear if you have clicked the appropriate check box on the Setup Tab. You can disable the Emergency Stop Window using the check box, if you wish.
Note that when the mount is slewing, the values in the Telescope Position group box will change as the slew progresses and the word "SLEW" will flash. Note that the E and W in the upper corners of the graphic indicate the pier side. Click on 3D View to watch a representation of your telescope as it moves.
ReCal: Clicking this will Recal the mount to the RA/Dec position you have entered. In most circumstances, you will want to ReCal rather than Sync. ReCal is used to recalibrate the position of the mount if an object does not appear in the center of the field. Recalibrate can be used even when the object is past the meridian and the telescope is below the mount. ReCal recalibrates on the last object to which the telescope was sent.
NOTE: You can only use the ReCal option if APCC has the target object in its memory, i.e. you just gave a slew command and APCC already knows it should be at a particular position. You cannot use the ReCal option if you manually move the telescope to another position, since APCC has no way of knowing the position of that object. In this situation, use Sync as described below. For more detailed discussion, refer to the section below entitled: Sync Explained in Detail and Compared to Recalibrate.
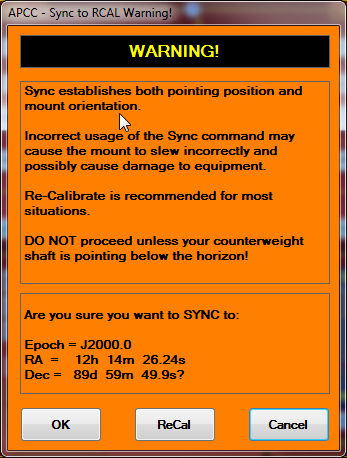
Sync: Clicking this will Sync the mount to the RA/Dec position you have entered. Since misusing Sync is a common occurrence, a warning will display when you make this selection. In particular, be very careful that the mount is not in a counterweight-up position when syncing, as it might be if you are using the Meridian Delay feature. For more detailed discussion, refer to the section below entitled: Sync Explained in Detail and Compared to Recalibrate.
Please read the warning, think carefully and make the appropriate selection.
Save: This will save the RA/Dec coordinates to the drop-down list.
1.First, manually enter the coordinates or Load Current (see below) the coordinates that you wish to save.
2.Confirm the coordinates that populate the coordinate fields.
3.Select the Save button.
4.The Saving GoTo Position window will prompt you to enter an optional title. If you do not enter a title, one will be created for you based on the position in the drop-down box, for instance: Saved #9.
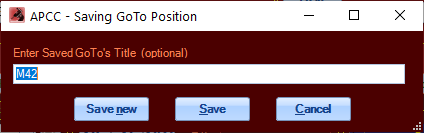
5.Click Save or Save New. Save will update the currently selected entry, while Save New will create a new entry.
6.If you decide that you want to remove any items from the list, select that item from the drop-down box and click the Delete button.
Load: Select the desired target from the drop-down list box. When you click the Load button, the RA/Dec coordinates with the selected values from your target object will populate the RA/Dec fields.
Load Mount RA/Dec: Polls the mount for its current position and then loads the RA/Dec fields with the mount's current coordinates.
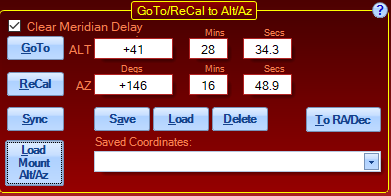
GoTo/ReCal to Alt/Az
Altitude and Azimuth coordinates are entered in much the same way as the RA and Dec coordinates described above. Here too, entries can be in sexagesimal or decimal form. Valid entries for altitude are from -20 to + 90 degrees, although it is very unlikely that you will ever use negative altitude values. Azimuth values can range from 0 to 359°59'59". Az = 0 is always due north (regardless of your hemisphere). Az = 90 is due east. Az = 180 is due south. And Az = 270 is due west.
As with RA/Dec, you can enter a decimal value in the Mins fields. The decimal portion will be converted into seconds automatically when you press the enter key or leave the field.
All of the actions and buttons below are like the ones above where they are explained in greater detail.
Clear Meridian Delay: Normally you will want this check box enabled as it can prevent a pier collision. When enabled, the resulting slew position will always be with the telescope counterweight down.
However, if you want to slew to a counterweight-up position, then you may need to disable this option and set the mount's meridian delay appropriately. Care should be taken to prevent a pier collision!
GoTo: Clicking this will slew the mount to the Alt/Az position you have entered.
ReCal: Clicking this will recalibrate the mount to the Alt/Az position you have entered.
Sync: Clicking this will sync the mount to the Alt/Az position you have entered. Be very careful that the mount is not in a counterweight-up position when using this.
Save: If you want to save the position, click the Save button. You will be prompted to enter a title, if you wish. Click Save to change the selected position, or Save New to save as a new entry in the list. The Alt/Az coordinates will be added to the description. You may also cancel or clear, if you change your mind about saving the item.
If you decide that you want to remove any items from the list, select that item from the drop-down box and click the Save button. Then click the Clear button.
Load: Select the desired target from the drop-down box. This will load the Alt/Az coordinates for the target object into the Alt/Az fields.
Delete: If you decide that you want to remove any items from the list, select that item from the drop-down box and click the Delete button
To RA/Dec: Converts the displayed Alt/Az coordinates to RA/Dec and fills the fields in the RA/Dec group box with the coordinates.
Load Mount Alt/Az: Polls the mount for its current position and then loads the Alt/Az fields with the current coordinates.
Sync Explained in Detail and Compared to Recalibrate
Sync and Recalibrate are often used as synonyms in everyday use, but to APCC and the GTO Control Box directing the movements of your mount, they are different and distinct. Understanding this distinction will aid you in enjoying your Astro-Physics GoTo system.
The Sync command is typically used at the beginning of an observing or imaging session. Sync tells the mount where it is pointing and defines which is the telescope side and which is the counterweight side. It is a powerful command in that it disregards earlier slewing commands and starts over. It does not take the last entered position into account, but tells the mount – “You are here,” based on the object (actually, the coordinates) displayed on the keypad or computer screen. It assumes that the telescope is correctly pointed with the sync object and the telescope on opposite sides of the meridian.
Each time you use sync, you redefine the orientation of the telescope and counterweight to the mount. If used in the wrong way, the sync command will cause the mount to slew incorrectly and possibly cause damage to equipment. It should therefore be used with caution.
Why is the Sync command a potential problem if used incorrectly? There are two main reasons. The first reason comes from the fact that both axes of the mount are full 360° circles that are not restricted in their motion. The second comes from the fact that the mount must rely on the information it is given: in particular, the date, time, daylight savings and location data to know where the meridian is. As smart and sophisticated as these systems are, they cannot see the sky or their own orientation and must rely on the operator to give them their proper start.
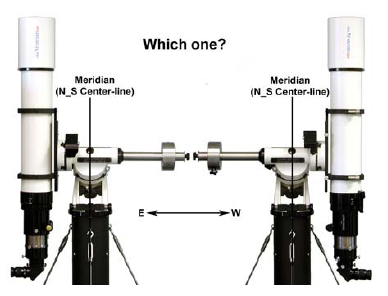
Let’s examine the first issue. Why would the full circular nature of the axes create a problem potential? First, if you loosen your clutches, and then remove your telescope, mounting hardware and counterweight shaft, you can simply turn both axes round and round to your heart’s content. Since the clutches were disengaged, the servo drive system can not possibly have any idea where the axes are pointing before you tell it by syncing the mount. This is a critical problem because of the fact that for any location in the sky, there would be two possible ways to point at it if there were no obstructions (like a pier) in the way. See the illustration below:

Both images show a telescope pointing at the same object. The image on the right is obviously wrong, and no experienced astronomer would position his or her mount like this, but the mount cannot know which alternative has been chosen. The software was therefore written to subsequently slew the mount assuming the sync position was correct as shown on the left. It bases its assumption of where the meridian is and where the pier is on the correct orientation of the system when it is synced.
Well, you might ask, if no one would be dumb enough to sync with their mount positioned like the one on the right in the illustration above, why even bring it up? The reason is that things aren’t always as easy as the above illustration – it was designed to make the point obvious. Take a look at the next illustration. Is it OK to use sync in either of these situations? The answer is maybe, but I wouldn’t really advise it.
This brings us to the second main reason that sync can be a problem if used incorrectly. The illustration above shows that it can be difficult to tell which side of the meridian you are pointing at when pointing near the meridian. This assumes that the meridian is where it’s supposed to be. Now wait a minute, you say. We all know that the meridian is the north – south line that is straight up: directly overhead. It goes through the zenith. It has to be where it’s supposed to be! That is true, but the mount can’t see like you and I can. It can’t look up and see the meridian; it has to calculate the meridian based on the data we give it. That data is the location, the date, the time and whether or not daylight savings is in effect. Errors in this data will result in errors in the calculated position of the meridian with respect to the object being synced.
Daylight savings is an easy example to understand. It changes our clocks by one hour, forward each spring, backward each fall. Each hour is equivalent to 15° of sky. Therefore, a simple mistake in the entered value (off or on) for daylight savings will throw the calculated meridian off by a whopping 15°. The next illustration shows this.
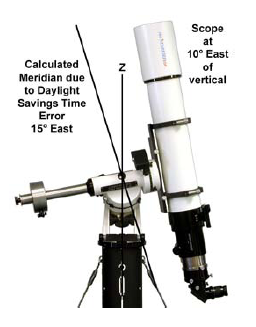
The telescope is 10° east of the true meridian. If syncing on a star with the telescope in this position, you would (and it should be on=1), the calculated meridian will be 5° too far to the east to sync! Likewise, just entering the wrong location (i.e. your back yard location number instead of your dark site location number) can throw you off by enough to make any sync close to the meridian worth reconsidering.
Sync is a very important, handy and powerful command. Don’t be scared to use it, just follow these safe guidelines now that you understand how it works:
1. Your mount MUST be polar aligned. Since sync establishes the mount’s orientation with respect to the telescope, counterweight shaft and pier, polar alignment is a prerequisite.
2. NEVER sync if your counterweight shaft is pointing up. Avoid syncing if your counterweight shaft is close to horizontal. Remember that the sync object and the telescope must be on opposite sides of the mount / meridian.
3. Do not use sync if your meridian delay feature is turned on. Meridian delay overrides the mount’s orientation / clock information and can lead to the same problem as syncing when the mount is improperly oriented.
4. Compare the current LST value the R.A. value for the star you will be syncing on. Remember that the LST value changes along with time; you can’t use the LST value you remember from several hours ago. If the R.A. number is larger than the LST value, the star is east of the mount’s calculated meridian and the scope should be on the west side of the mount. If the R.A. value is smaller, the star is west of the calculated meridian and the scope should be on the east. This is an especially good way to check, since it uses the mount’s calculated meridian and therefore bypasses any errors in time or location data.
5. To verify that everything is set correctly once you have synced, go to the RA and Dec entry screens on this GoTo/ReCal tab and enter the current LST value. For the DEC value, enter your latitude. Press GOTO. After slewing, your counterweight shaft should be perfectly horizontal. and the scope will be pointing straight up as well. This is a good test because it also indicates whether your time and location data are correct.
6. Your sync will result in greater pointing accuracy if you sync to a single star that is close to the celestial equator, rather than close to your pole. This has nothing to do with the sync command itself, but instead is because of the geometry of the celestial sphere. Think of the longitude lines on a globe, how they are widest at the equator, but converge at the poles. A small error in centering a star near the pole would translate into a larger R.A. error than the same centering error on a star near the celestial equator.

In summary, you use the sync command once in an observing or imaging session unless the telescope gets physically moved by hand or by accident (as opposed to moved with the N-S-E-W buttons). While it can be used to tweak pointing accuracy, we prefer to use recalibrate for that. We also recommend that you Sync on objects that are at least 15 deg. (1 hour) from the meridian. This will help safeguard you from a potential clock related problem – i.e. you forgot about daylight savings time, and it makes it easier to see that the object and telescope are on opposite sides of the meridian. If you are permanently mounted and do not disturb the scope position, you do not need to use it after the very first setup.
Recalibrate is the “tweak” command. It is quick and easy and is perfect for fine-tuning your pointing accuracy during your observing or imaging session. Rather than telling the mount where it is pointing, recalibrate corrects its minor pointing inaccuracies. Recalibrate works on the object in memory that the mount thinks it is already pointing at. Since it does not re-establish the mount’s position in memory, it doesn’t matter if the telescope and ReCal object are both on the same side of the meridian. It is therefore a safer command to use during your session.
Remember that for both commands, the preferred object of choice will always be a single bright star because it is a single point source. Avoid double or multiple stars if possible. Solar system objects can be useful for daylight syncing or recalibrating. In addition, remember that pointing accuracy is also dependent on the accuracy of the polar alignment and the orthogonality of the entire system.
CAUTION: It is important to note that external software programs may not make the same distinction between the 2 terms, so be careful when syncing or recalibrating (or whatever they call it) with other programs. For safety sake, we recommend that you utilize the SNYC -> RCal Translation safeguard described on the Virtual Ports tab.